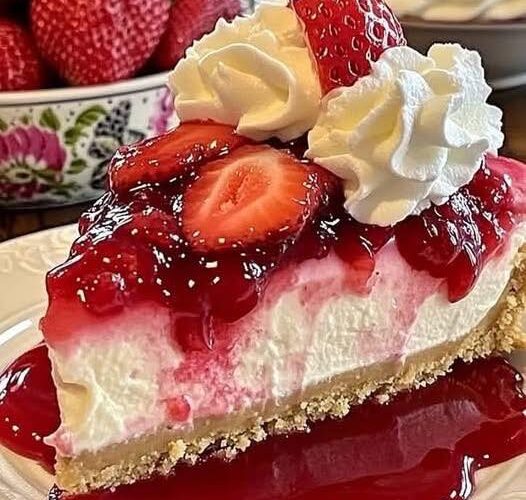
Ein perfekt zubereiteter Erdbeer-Käsekuchen hat etwas unwiderstehlich Verführerisches – der buttrige Boden, die samtig-zarte Füllung und das leuchtende Topping aus frischen Beeren. Diese Version ohne Backen vereint die cremige Fülle von Mascarpone und griechischem Joghurt mit der natürlichen Süße frischer Erdbeeren – alles auf einem schokoladenbestreuten Keksboden. Und das Beste: Sie können dieses atemberaubende Dessert zubereiten, ohne den Backofen einzuschalten!
Zutaten
Für die Basis:
- 200 g (7 oz) Butterkekse/Graham Crackers
- 150 g (⅔ Tasse) ungesalzene Butter
- 50 g (1,8 oz) dunkle Schokolade
Für die Füllung:
- 700 g (3 Tassen) griechischer Joghurt
- 300 g Mascarpone
- 2 Esslöffel Zitronensaft
- 120 g (½ Tasse) Kristallzucker
- 1 Päckchen (8 g) Vanillezucker (oder 1 Teelöffel Vanilleextrakt)
- 6 Blätter (12 g) Gelatine (oder 3 Teelöffel Gelatinepulver)
- 300 g (1¼ Tassen) Sahne
Für den Belag:
- 600 g (21 oz/ca. 4 Tassen) frische Erdbeeren
- 120 g (½ Tasse) Erdbeergelee/-marmelade
Sie benötigen außerdem:
- 1 Gefrierbeutel
- 24–26 cm (9–10 Zoll) Springform
Anweisungen
- Keksboden zubereiten : Die Butterkekse in einen Gefrierbeutel geben und mit einem Nudelholz fein zerkleinern. Alternativ können Sie hierfür auch eine Küchenmaschine verwenden.
- Schokolade hinzufügen : Die Butter in einem kleinen Topf bei schwacher Hitze oder in der Mikrowelle schmelzen. Die dunkle Schokolade reiben. Die geschmolzene Butter unter die zerbröselten Kekse rühren, bis sie gleichmäßig befeuchtet sind, dann die geriebene Schokolade unterheben.
- Boden formen : Den Rand einer Springform (24–26 cm Durchmesser) auf einen flachen Servierteller legen. Die Keksmasse gleichmäßig in den Boden drücken. Etwa 25 Minuten im Kühlschrank fest werden lassen.
- Gelatine vorbereiten : Während der Boden kühlt, die Gelatineblätter 5–10 Minuten in kaltem Wasser einweichen, bis sie weich sind. Bei Verwendung von Pulvergelatine diese mit 6 Esslöffeln kaltem Wasser bestreuen und 5 Minuten ziehen lassen.
- Füllung zubereiten : Griechischen Joghurt, Mascarpone, Zitronensaft, Zucker und Vanillezucker in einer großen Schüssel vermengen. Verrühren, bis eine glatte Masse entsteht.
- Gelatine einarbeiten : Die eingeweichten Gelatineblätter ausdrücken und in einem kleinen Topf oder in der Mikrowelle leicht erhitzen (nicht kochen). 3-4 Esslöffel der Joghurt-Mascarpone-Mischung unter die aufgelöste Gelatine rühren. Anschließend die Mischung zurück in die Joghurt-Mascarpone-Schüssel geben und vollständig verrühren.
- Sahne hinzufügen : Schlagen Sie in einer separaten Schüssel die Schlagsahne steif. Heben Sie die Schlagsahne vorsichtig unter die Joghurt-Mascarpone-Mischung, bis sie gut vermischt ist. Behalten Sie dabei so viel Luft wie möglich.
- Assemble: Pour the cream filling over the chilled biscuit base, smoothing the top with a spatula. Refrigerate for 2-3 hours, or ideally overnight, until the filling is completely set.
- Prepare strawberries: Wash, hull, and halve the strawberries. Arrange them decoratively on top of the set cheesecake.
- Add glaze: Warm the strawberry jelly in a small saucepan until it becomes liquid. Using a spoon, carefully drizzle or brush the warmed jelly over the arranged strawberries. Return the cheesecake to the refrigerator to allow the glaze to set, about 30 minutes.
- Serve: Carefully remove the springform rim before serving. For clean slices, dip your knife in hot water between cuts.
Nutritional Information and Timing
Prep Time: 40 minutes
Setting Time: Minimum 3 hours (preferably overnight)
Total Time: 3 hours 40 minutes (minimum)
Servings: 12 slices
Nutritional Information (per slice):
- Calories: 420
- Protein: 7g
- Carbohydrates: 28g
- Fat: 32g
- Fiber: 1g
- Sugar: 21g
- Sodium: 170mg
Cooking Tips and Tricks
- Temperature matters: Ensure all dairy ingredients are at room temperature before mixing to prevent lumps in your filling.
- Perfect base: For an extra-firm base, press the biscuit mixture down using the bottom of a glass or measuring cup.
- Gelatin technique: When incorporating gelatin, make sure it’s completely dissolved but not too hot when added to the cream mixture, or it may set prematurely.
- Smooth filling: For an ultra-smooth texture, pass the Greek yogurt through a fine sieve before mixing with other ingredients.
- Clean cuts: For picture-perfect slices, dip your knife in hot water and wipe clean between each cut.
- Preventing cracking: Allow the cheesecake to set in the refrigerator gradually rather than placing it in the freezer to speed up the process.
- Base variations: To enhance the chocolate flavor, use chocolate biscuits instead of plain butter biscuits.
Variations and Substitutions
- Berry alternatives: Replace strawberries with raspberries, blueberries, or a mixed berry combination for different flavor profiles.
- Dairy options: Substitute part or all of the Greek yogurt with sour cream for a tangier flavor, or use cream cheese instead of mascarpone for a more traditional cheesecake taste.
- Lighter version: Use low-fat Greek yogurt and light cream cheese to reduce calories without sacrificing too much flavor.
- Vegan adaptation: Replace dairy ingredients with plant-based alternatives such as coconut cream, cashew cream, and vegan cream cheese. Use agar-agar instead of gelatin.
- Citrus twist: Add lemon or lime zest to the filling for a refreshing citrus note that complements the strawberries beautifully.
- Chocolate lover’s version: Add 100g of melted white chocolate to the filling mixture, or drizzle the finished cake with dark chocolate for an extra decadent touch.
- Nutty base: Add 50g of finely chopped hazelnuts or almonds to the biscuit base for added texture and flavor.
Common FAQs
Q: Can I make this cheesecake without gelatin?
A: Yes, you can substitute the gelatin with 2 tablespoons of cornstarch dissolved in a little cold water and then heated until thickened, or use agar-agar following package instructions. The texture will be slightly different but still delicious.
Q: My cheesecake filling hasn’t set properly. What went wrong?
A: This usually happens when the gelatin wasn’t properly dissolved or incorporated, or if the cheesecake didn’t chill long enough. Give it more time in the refrigerator, or for a quick fix, place it in the freezer for 30-60 minutes.
Q: Can I use frozen strawberries for the topping?
A: Fresh strawberries work best for the topping as they hold their shape and have better texture. However, frozen strawberries can be used in the filling or made into a sauce, but they tend to release too much moisture when thawed for the topping.
Q: How far in advance can I make this cheesecake?
A: You can prepare the cheesecake base and filling 2 days in advance, but it’s best to add the fresh strawberry topping within 24 hours of serving.
Q: Why did my filling curdle when I added the gelatin?
A: If the gelatin mixture is too hot when added to the cream filling, it can cause curdling. Always let the dissolved gelatin cool slightly before incorporating it, and mix a small amount of the filling into the gelatin first before adding it back to the main mixture.
Storage and Make-Ahead Tips
- Refrigerator storage: This cheesecake will keep well in the refrigerator for up to 3-4 days. Cover loosely with plastic wrap or place in an airtight container to prevent it from absorbing other food odors.
- Freezing option: The cheesecake can be frozen without the strawberry topping for up to 1 month. Wrap it well in plastic wrap and aluminum foil. Thaw overnight in the refrigerator and add fresh strawberry topping before serving.
- Component prep: You can prepare different elements ahead of time – make the base up to 3 days in advance and keep refrigerated; prepare the filling a day ahead; add strawberries and glaze on the day of serving.
- Traveling with cheesecake: If transporting the cheesecake, freeze it for 1-2 hours beforehand (not completely frozen) to help it maintain its shape during transit.
- Vorbeugen gegen Durchweichen : Wenn Sie die Kekse schon lange im Voraus zubereiten, können Sie den Keksboden mit geschmolzener Schokolade bestreichen und fest werden lassen, bevor Sie die Füllung darauf geben. Dadurch entsteht eine Barriere, die verhindert, dass der Boden durchweicht.
Dieser Erdbeer-Käsekuchen ohne Backen ist perfekt für warme Sommertage, an denen man den Backofen nicht anmachen möchte, oder als Dessert zum Vorbereiten für Gäste. Die Kombination aus cremiger Füllung, knusprigem Boden und frischen Erdbeeren ergibt einen wahrhaft köstlichen Leckerbissen, der Familie und Freunde gleichermaßen begeistern wird!