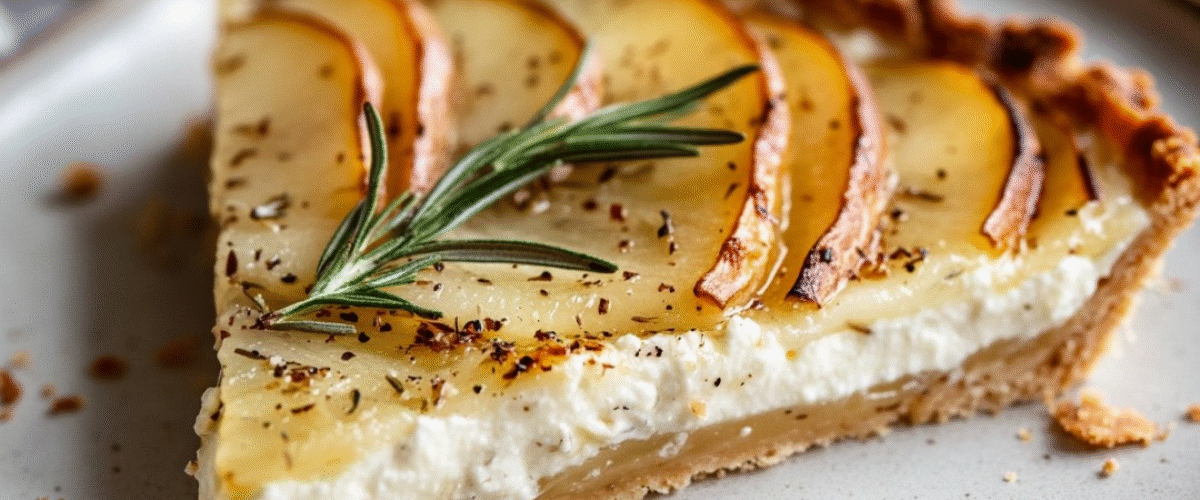
Diese elegante Birnen-Rosmarin-Ricotta-Tarte vereint erdige, süße und herzhafte Elemente in perfekter Harmonie. Der rustikale Haselnuss-Hafer-Boden bildet die nahrhafte Basis für die cremige, mit Kräutern angereicherte Ricotta-Füllung, während fein arrangierte Birnenscheiben für eine atemberaubende Optik sorgen. Perfekt für Brunch, Nachmittagstee oder als leichte Dessertvariante – diese saisonale Tarte verbindet auf wunderbare Weise süß und herzhaft.
Zutaten
Für den Teig
- 160 g (1¾ Tassen) Haferflocken
- 80 g (½ Tasse) geröstete Haselnüsse
- 1 großes Ei
- 3 Esslöffel (45 ml) Olivenöl
- 1 Esslöffel (15 ml) Ahornsirup
- ¼ Teelöffel Meersalz
Für die Füllung
- 4 feste Bosc- oder Anjou-Birnen (ca. 800 g)
- 250 g (1 Tasse) Ricotta-Käse
- 1 Ei
- 1 Esslöffel frischer Rosmarin, fein gehackt
- 2 Teelöffel Zitronenschale
- 2 Esslöffel Zitronensaft
- 2 Esslöffel Ahornsirup
- ½ Teelöffel Vanilleextrakt
- ¼ Teelöffel frisch gemahlener schwarzer Pfeffer
- Prise Meersalz
Anweisungen
Den Teig zubereiten
- Heizen Sie Ihren Backofen auf 175 °C (350 °F) vor. Legen Sie den Boden einer 9-Zoll-Tarteform mit herausnehmbarem Boden mit Backpapier aus.
- Die Haferflocken und die gerösteten Haselnüsse in eine Küchenmaschine geben. Pulsieren, bis ein grobes Mehl mit etwas Struktur entsteht.
- Ei, Olivenöl, Ahornsirup und Salz in die Küchenmaschine geben. Mehrmals pulsieren, bis die Mischung beim Drücken zwischen den Fingern zusammenklebt. Die Mischung sollte leicht klebrig, aber nicht feucht sein.
- Die Krustenmischung in die vorbereitete Tarteform geben. Mit den Fingern oder dem flachen Boden eines Messbechers die Mischung fest und gleichmäßig auf dem Boden und etwa 3,8 cm am Rand der Form hochdrücken.
- Damit der Boden beim Backen nicht aufgeht, stechen Sie ihn mehrmals mit einer Gabel in den Boden.
- Die Tarteform auf ein Backblech stellen und im vorgeheizten Backofen 10 Minuten backen. Aus dem Ofen nehmen und etwas abkühlen lassen, während die Füllung zubereitet wird. Die Ofentemperatur konstant halten.
Birnen und Füllung vorbereiten
- Entkernen Sie die Birnen und schneiden Sie sie in dünne Scheiben (etwa 3 mm dick), entweder vertikal oder horizontal, je nachdem, welche Präsentation Sie bevorzugen.
- Legen Sie die Birnenscheiben in eine Schüssel und vermengen Sie sie vorsichtig mit dem Zitronensaft, um ein Bräunen zu verhindern und ihrem Geschmack eine frische Note zu verleihen.
- Ricotta, Ei, fein gehackten frischen Rosmarin, Zitronenschale, Ahornsirup, Vanilleextrakt, frisch gemahlenen schwarzen Pfeffer und eine Prise Meersalz in einer mittelgroßen Schüssel vermengen. Verrühren, bis eine glatte, gut vermischte Masse entsteht.
Zusammensetzen und Backen der Torte
- Verteilen Sie die Ricotta-Mischung gleichmäßig auf dem vorgebackenen Boden und glätten Sie die Oberfläche mit einem Spatel.
- Die Birnenscheiben in konzentrischen Kreisen auf der Ricotta-Füllung anordnen, sodass sie sich leicht überlappen, um eine dekorative Note zu erhalten. Beginnen Sie am äußeren Rand und arbeiten Sie sich zur Mitte vor.
- Gently press the pear slices slightly into the ricotta filling to ensure they adhere well.
- Return the tart to the oven and bake for 35-40 minutes, until the filling is set (it should have just a slight jiggle in the center) and the pears are tender with lightly golden edges.
- Remove from the oven and place the tart pan on a wire rack. Allow the tart to cool in the pan for at least 30 minutes before removing the sides and slicing.
Nutritional Information
Per serving (based on 8 slices):
- Calories: 275
- Total Fat: 14g
- Saturated Fat: 3g
- Cholesterol: 60mg
- Sodium: 125mg
- Total Carbohydrates: 31g
- Dietary Fiber: 5g
- Sugars: 15g
- Protein: 9g
Preparation Time: 25 minutes Cooking Time: 45-50 minutes Total Time: Approximately 1 hour 15 minutes, plus cooling time
Cooking Tips and Tricks
- Toasting hazelnuts: For the best flavor, toast hazelnuts in a 350°F (175°C) oven for 8-10 minutes until fragrant and skins begin to crack. Rub in a clean kitchen towel to remove some of the skins.
- Pear selection: Choose pears that are ripe but still firm for best results. If the pears are too soft, they’ll release too much moisture during baking and could make the tart soggy.
- Crust thickness: When pressing the crust into the pan, aim for even thickness throughout. Pay special attention to the corners where the bottom and sides meet, as these areas tend to get too thick.
- Ricotta tip: For a smoother filling, you can process the ricotta briefly in a food processor before adding the other filling ingredients.
- Pear arrangement: Slice the pears thinly and consistently for even cooking and an attractive appearance. Try different arrangements – concentric circles, a spiral pattern, or even a fan shape – for visual impact.
- Testing doneness: The tart is ready when the filling is mostly set but still has a slight jiggle in the center. It will continue to set as it cools.
Variations and Substitutions
Fruit Alternatives:
- Apple Variation: Substitute thinly sliced apples (such as Honeycrisp or Pink Lady) for a more robust fall flavor.
- Stone Fruit Option: During summer, try using plums or apricots instead of pears.
- Berry Addition: Scatter a handful of fresh berries between the pear slices for pops of color and tartness.
Crust Adaptations:
- Nut Substitutions: Replace hazelnuts with almonds, walnuts, or pecans based on preference.
- Gluten-Free Certainty: Ensure oats are certified gluten-free if preparing for someone with celiac disease.
- Vegan Crust: Use a flax egg (1 tablespoon ground flaxseed mixed with 3 tablespoons water, left to gel for 10 minutes) instead of the egg.
Flavor Variations:
- Herb Swaps: Try thyme or sage instead of rosemary for different aromatic profiles.
- Sweetener Options: Substitute honey for maple syrup (though this will change the flavor profile slightly).
- Spice Additions: Add ¼ teaspoon of cardamom or cinnamon to the filling for a warming spice element.
Dietary Modifications:
- Lower Fat: Use part-skim ricotta and reduce olive oil to 2 tablespoons.
- Dairy-Free: Substitute cashew cream for ricotta (blend 1 cup soaked cashews with ¼ cup water until very smooth).
- Higher Protein: Add 2 tablespoons of unflavored protein powder to the crust mixture.
Common FAQs
Q: Can I make this tart ahead of time?
A: Yes! The tart can be made up to 24 hours in advance and stored in the refrigerator. Let it come to room temperature for about 30 minutes before serving for the best flavor and texture.
Q: My crust seems crumbly. What am I doing wrong?
A: The crust mixture might be too dry. Add an extra teaspoon of olive oil or a small amount of water, one teaspoon at a time, until the mixture holds together when pressed between your fingers.
Q: The pears turned brown before I could arrange them. How can I prevent this?
A: Work quickly after slicing the pears and make sure to toss them immediately with lemon juice. You can also prepare the ricotta filling first so it’s ready when you finish slicing the pears.
Q: Can I freeze this tart?
A: While possible, freezing is not ideal as the texture of the ricotta filling may change upon thawing. If you must freeze it, wrap well in plastic wrap and aluminum foil, freeze for up to one month, and thaw overnight in the refrigerator.
Q: How do I know when the tart is properly baked?
A: The filling should be mostly set with just a slight jiggle in the center when you gently shake the pan. The edges of the pears should be lightly golden, and the crust should be firm and golden brown.
Storage and Make-Ahead Tips
- Room Temperature: The tart can be kept at room temperature for up to 2 hours before serving.
- Refrigeration: Store leftovers in an airtight container or wrapped in plastic wrap in the refrigerator for up to 3 days.
- Reheating: While delicious cold, you can warm individual slices in a 300°F (150°C) oven for 10 minutes if preferred.
- Make-Ahead Components: The crust can be prepared and pre-baked a day ahead and stored at room temperature, covered. The ricotta filling can also be prepared a day ahead and refrigerated separately.
- Serving suggestions: For an elegant presentation, dust with a little powdered sugar just before serving, or drizzle with a small amount of honey. Serve alongside a dollop of whipped cream or a spoonful of Greek yogurt for added creaminess.
- Transporttipp: Wenn Sie die Torte zu einer Veranstaltung mitnehmen, lassen Sie sie bis zur Ankunft am Zielort in der Form, um die empfindliche Füllung und Kruste zu schützen.
Diese Birnen-Rosmarin-Ricotta-Tarte mit Haselnuss-Hafer-Kruste ist ein schönes Beispiel dafür, wie aus gesunden Zutaten ein elegantes Gericht für besondere Anlässe entstehen kann. Die Kombination aus zarten Birnen, aromatischem Rosmarin und cremigem Ricotta ergibt ein raffiniertes Geschmacksprofil, das zugleich wohltuend und raffiniert ist. Ob als leichtes Dessert, als Brunch-Hauptgericht oder zum Nachmittagstee – diese vielseitige Tarte überzeugt mit ihrem professionellen Aussehen und ihren harmonischen Aromen.