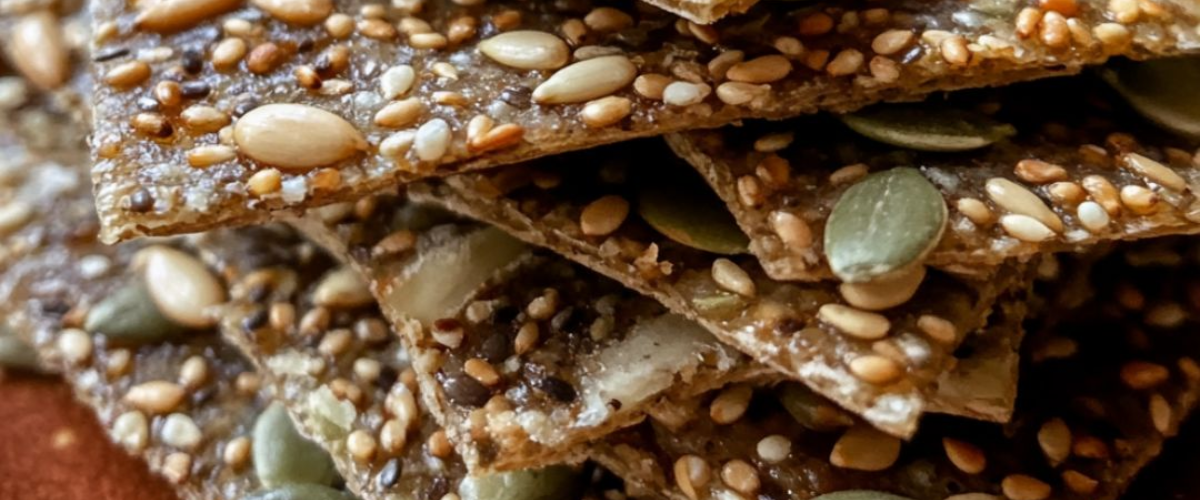
Die perfekte, gesunde Alternative zu verarbeiteten Snacks
Mehrkorncracker stellen die ideale Verbindung von Nährwert und Komfort in der heutigen gesundheitsbewussten Ernährungswelt dar. Im Gegensatz zu industriell hergestellten Crackern voller Konservierungsstoffe und raffiniertem Mehl präsentieren diese hausgemachten Köstlichkeiten die natürliche Schönheit der Samen – jedes kleine Stückchen trägt sein einzigartiges Nährwertprofil und seine subtilen Geschmacksnuancen bei.
Diese Cracker erfreuten sich zunächst in skandinavischen Ländern großer Beliebtheit und werden dort als „Knäckebröd“ oder Knäckebrot bezeichnet. Traditionell werden sie aus Roggenmehl und -körnern hergestellt. Unsere moderne Version verzichtet vollständig auf Getreide und setzt stattdessen auf die natürlichen Bindeeigenschaften von Flohsamenschalen und die gallertartige Wirkung von Leinsamen, wenn sie mit heißem Wasser angerührt werden.
Was diese Cracker so besonders macht, ist ihre bemerkenswerte Textur – knackig knusprig und dennoch gehaltvoll genug für herzhafte Beläge. Jeder Bissen bietet ein angenehmes Knuspergefühl, gefolgt vom komplexen, nussigen Geschmack gerösteter Körner. Ihr rustikales Aussehen zeugt von ihrer hausgemachten Qualität. Die unterschiedlichen Formen und Größen der Körner bilden ein optisch beeindruckendes Mosaik, das ebenso schön wie köstlich ist.
Ob mit Käse als elegante Vorspeise, als proteinreicher Snack zum Hummus oder pur – diese Cracker werden Ihre Vorstellung von einem wirklich gesunden Cracker verändern. Und das Beste: Sie sind unglaublich einfach zuzubereiten – mit minimalem Aufwand und nur einer Handvoll nährstoffreicher Zutaten.
Zutaten
Für das Grundrezept:
- 1 Tasse (150 g) gemischte Samen (Kombination aus):
- ¼ Tasse (35 g) Sonnenblumenkerne
- ¼ Tasse (35 g) Kürbiskerne
- 3 Esslöffel (30 g) Sesamsamen
- 2 Esslöffel (20 g) Leinsamen
- 2 Esslöffel (30 g) Chiasamen
- ¼ Tasse (45 g) ungekochter Quinoa
- 2 Esslöffel (10 g) Flohsamenschalenpulver
- 1 Teelöffel (5 g) feines Meersalz
- 1 Esslöffel (15 ml) natives Olivenöl extra
- 1 Tasse (240 ml) kochendes Wasser
- Optional: 1 Teelöffel getrocknete Kräuter oder Gewürze (Rosmarin, Thymian, Kreuzkümmel oder Za’atar)
Anweisungen
Schritt 1: Bereiten Sie Ihre Zutaten vor
- Heizen Sie Ihren Backofen auf 165 °C (325 °F) vor und legen Sie ein großes Backblech mit Backpapier aus.
- Messen Sie alle trockenen Zutaten ab und stellen Sie sicher, dass Sie für die beste Konsistenz eine große Auswahl an Korngrößen haben.
- Wenn Sie ganze Leinsamen verwenden, können Sie die Hälfte davon für eine bessere Bindung kurz in einer Gewürzmühle mahlen.
Schritt 2: Den Teig mischen
- In einer mittelgroßen Rührschüssel alle Samen, Quinoa, Flohsamenschalenpulver, Salz und optional Kräuter oder Gewürze vermengen. Gründlich vermischen.
- Fügen Sie das Olivenöl hinzu und rühren Sie um, um es gleichmäßig in der Samenmischung zu verteilen.
- Gießen Sie das kochende Wasser unter ständigem Rühren mit einem Holzlöffel oder Silikonspatel über die Samenmischung.
- Rühren Sie etwa 30 Sekunden lang weiter, bis das gesamte Wasser absorbiert ist und keine trockenen Stellen mehr vorhanden sind.
- Let the mixture sit undisturbed for 10 minutes. During this time, the psyllium husk and chia seeds will absorb moisture and create a thick, paste-like consistency.
Step 3: Shape and Score
- Place another sheet of parchment paper on your work surface and transfer the seed mixture onto it.
- Place a second sheet of parchment paper on top of the mixture.
- Using a rolling pin, roll the mixture between the parchment sheets until it’s about ⅛ inch (3 mm) thick. Aim for an even thickness throughout for consistent baking.
- Carefully peel off the top sheet of parchment paper.
- Using a knife or pizza cutter, score the dough into your desired cracker shapes. Rectangles or squares work well, but you can be creative with diamond shapes or any pattern you prefer.
- For even baking, prick each cracker several times with a fork to prevent air bubbles from forming.
Step 4: First Bake
- Transfer the entire bottom parchment with your scored cracker dough to your prepared baking sheet.
- Place in the preheated oven and bake for 30-35 minutes, until the edges begin to brown and the surface looks dry.
- Remove from the oven but leave the oven on.
Step 5: Flip and Complete Baking
- Allow the partially baked cracker sheet to cool for about 5 minutes until it’s comfortable to handle.
- Place another baking sheet or cutting board on top of the crackers and, holding both together, carefully flip the entire thing over.
- Gently peel off the parchment paper that is now on top (originally the bottom layer).
- Return the crackers to the oven and bake for an additional 25-30 minutes, until they’re completely dry, crisp, and golden brown throughout.
- Check frequently during the last 10 minutes to prevent burning, as seeds can quickly go from perfectly toasted to burnt.
Step 6: Cool and Store
- Remove the baking sheet from the oven and allow the crackers to cool completely on the sheet. They will continue to crisp up as they cool.
- Once fully cooled, break the crackers along your score lines.
- Store in an airtight container at room temperature for up to 2 weeks. For extended freshness, you can store them in the refrigerator for up to 1 month.
Nutritional Information and Timing
Preparation Time: 15 minutes
Resting Time: 10 minutes
Baking Time: 55-65 minutes
Total Time: 1 hour 30 minutes
Yield: Approximately 30-36 crackers
Nutritional Information (per 6 crackers):
- Calories: 175 kcal
- Protein: 6 g
- Carbohydrates: 12 g
- Dietary Fiber: 7 g
- Total Fat: 12 g
- Saturated Fat: 1.5 g
- Polyunsaturated Fat: 7 g
- Monounsaturated Fat: 3.5 g
- Sodium: 255 mg
- Potassium: 210 mg
- Iron: 2 mg (11% DV)
- Magnesium: 80 mg (20% DV)
- Zinc: 1.2 mg (11% DV)
- Omega-3 Fatty Acids: 1.8 g
Note: Nutritional values are approximations and may vary depending on specific ingredients used.
Cooking Tips and Tricks
For Perfect Seed Crackers Every Time:
- Thickness matters: Roll your seed mixture to an even ⅛ inch thickness—any thicker and the crackers won’t crisp properly; any thinner and they’ll burn before cooking through.
- The water must be boiling: The hot water partially cooks the psyllium and chia seeds, activating their binding properties. Room temperature water won’t work effectively.
- Score deeply: Make sure your knife cuts at least halfway through the dough when scoring to ensure clean breaks after baking.
- Edge monitoring: The outer edges tend to brown faster than the center. If this happens, you can remove the crackers that are done and return the rest to the oven.
- Humidity check: In humid climates, your crackers might absorb moisture and lose their crispness. If this happens, you can refresh them in a 300°F (150°C) oven for 5-10 minutes.
- Seed distribution: For the most attractive crackers, reserve a tablespoon of the larger seeds (pumpkin and sunflower) and sprinkle them on top of the rolled-out dough before baking.
- Salt topping: For a gourmet touch, sprinkle a small amount of flaky sea salt on top of the crackers just before the first bake. It adds visual appeal and a pleasant salt burst.
- Use a scale: For the most consistent results, measure your ingredients by weight rather than volume, especially the psyllium husk which can vary significantly in volume depending on how finely it’s ground.
Variations and Substitutions
Alternative Flavor Profiles:
- Mediterranean: Add 1 teaspoon dried oregano, ½ teaspoon garlic powder, and ¼ teaspoon dried thyme. Finish with a light sprinkle of nutritional yeast for a cheese-like flavor.
- Scandinavian: Include 1 tablespoon caraway seeds and ½ teaspoon ground cardamom for an authentic Nordic flavor profile.
- Spicy: Add ½ teaspoon cayenne pepper and 1 teaspoon smoked paprika for crackers with a pleasant heat that pairs beautifully with creamy dips.
- Everything Bagel: Mix in 1 tablespoon everything bagel seasoning (or make your own with dried garlic, dried onion, sesame seeds, poppy seeds, and salt).
- Sweet and Savory: Add 1 tablespoon maple syrup and a pinch of cinnamon for crackers that pair wonderfully with cheese or nut butters.
Ingredient Substitutions:
- Seed Swaps: Any combination of seeds works well—hemp seeds, poppy seeds, or nigella seeds make excellent additions or substitutions.
- Quinoa Alternatives: Raw buckwheat groats or amaranth can replace quinoa for a different nutritional profile and subtle flavor change.
- Psyllium Alternatives: If you don’t have psyllium husk, you can increase the chia seeds by 1 tablespoon and add 1 tablespoon ground flaxseed, though the binding won’t be quite as strong.
- Oil Options: Any neutral-tasting oil works well—avocado oil, coconut oil (melted), or even ghee can replace olive oil for different flavor notes.
- Grain Addition: For a slightly less dense cracker, replace ¼ cup of the seed mixture with quick-cooking rolled oats or quinoa flakes.
Common FAQs
Q1: Why did my crackers come out chewy instead of crisp?
A: Chewy crackers typically indicate they weren’t baked long enough or were too thick. Ensure you’re rolling the dough to about ⅛ inch thickness and that you’re baking until the crackers are completely dry and golden throughout. In humid environments, you may need to extend the baking time by 5-10 minutes. If your crackers lose their crispness during storage, refresh them in a 300°F (150°C) oven for 5-10 minutes.
Q2: Can I make these crackers without psyllium husk?
A: While psyllium husk is the ideal binder for these crackers, you can substitute it with a combination of additional ground flaxseeds and chia seeds. Use 1 tablespoon extra ground flaxseed and 1 tablespoon extra chia seeds in place of the 2 tablespoons of psyllium. Note that the texture may be slightly different, and you might need to adjust the water quantity slightly—start with ¾ cup and add more as needed.
Q3: How do I know when the crackers are completely done baking?
A: Properly baked seed crackers should be completely dry to the touch, golden brown throughout (not just at the edges), and should sound crisp when tapped with a fingernail. If you break one in half, it should snap cleanly with no soft or moist center. If you’re unsure, it’s better to bake them a few minutes longer at a slightly reduced temperature (300°F/150°C) than to underbake them.
Q4: My crackers are sticking to the parchment paper. What am I doing wrong?
A: Sticking typically occurs if the mixture was too wet or if you try to remove the parchment before the first baking period is complete. Make sure you’re using the correct amount of water and letting the mixture sit for the full 10 minutes before rolling. After the first bake, allow the crackers to cool for 5 minutes before attempting to remove the parchment, which makes separation easier. If sticking is a persistent problem, you can lightly oil the parchment paper before adding the seed mixture.
Q5: How can I make these crackers lower in sodium?
A: You can reduce the salt to ½ teaspoon or omit it entirely if you’re on a low-sodium diet. Consider adding more herbs and spices to compensate for the reduced salt—ingredients like nutritional yeast, onion powder, or smoked paprika can add savory depth without sodium. Alternatively, you could use a salt substitute or potassium chloride salt if appropriate for your dietary needs.
Storage and Make-Ahead Tips
Short-Term Storage:
- Store completely cooled crackers in an airtight container at room temperature for up to 2 weeks.
- Legen Sie ein kleines Päckchen Silicagel (aufbewahrt von anderen Lebensmittelverpackungen) in den Behälter, um die Feuchtigkeit zu absorbieren und die Cracker länger knusprig zu halten.
- In feuchten Klimazonen sollten Sie den Behälter im Kühlschrank aufbewahren. Dadurch kann die Frische auf 3–4 Wochen verlängert werden.
Langzeitlagerung:
- Diese Cracker lassen sich hervorragend einfrieren. Legen Sie sie in einen gefrierfesten Behälter und legen Sie zwischen den Schichten Backpapier aus, damit sie nicht aneinander kleben.
- Die Qualität gefrorener Cracker bleibt bis zu 3 Monate erhalten.
- Sie müssen die Cracker vor dem Servieren nicht auftauen – sie erreichen innerhalb weniger Minuten Zimmertemperatur. Alternativ können Sie sie für maximale Knusprigkeit 3–5 Minuten lang in einem auf 150 °C vorgeheizten Ofen erhitzen.
Optionen zum Vorbereiten:
- Bereiten Sie die Samenmischung (ohne Wasserzugabe) bis zu einem Monat im Voraus zu und lagern Sie sie in einem luftdichten Behälter an einem kühlen, dunklen Ort.
- Wenn Sie zum Backen bereit sind, geben Sie einfach das heiße Wasser hinzu und fahren Sie mit dem Rezept wie angegeben fort.
- Um Zeit zu sparen, bereiten Sie die doppelte Menge zu und frieren Sie die Hälfte für die spätere Verwendung ein.
Erfrischende, abgestandene Cracker:
- Wenn die Cracker mit der Zeit ihre Knusprigkeit verlieren, legen Sie sie in einer einzigen Schicht auf ein Backblech.
- Im Ofen bei 150 °C (300 °F) 5–10 Minuten lang erhitzen, bis sie wieder knusprig sind.
- Vor der erneuten Lagerung vollständig abkühlen lassen.
Serviervorschläge:
- Diese Cracker sind recht robust und eignen sich hervorragend als Grundlage für Vorspeisen. Bereiten Sie sie bis zu einer Woche im Voraus für Ihre Gäste vor.
- Bereiten Sie für eine Käseplatte Cracker in verschiedenen Formen und mit unterschiedlichen Körnerkombinationen zu, um sie optisch interessanter zu gestalten.
- Lagern Sie unterschiedliche Geschmacksrichtungen getrennt, um eine Geschmacksvermischung zu vermeiden.
Diese Mehrkorncracker vereinen Nährwert und kulinarisches Können perfekt. Jeder knusprige, nussige Bissen bietet nicht nur ein sattes Geschmackserlebnis, sondern auch eine beeindruckende Auswahl an essentiellen Nährstoffen – von herzgesunden Omega-3-Fettsäuren bis hin zu verdauungsfördernden Ballaststoffen. Sie zeigen, dass gesunde Ernährung nicht auf Geschmack oder Konsistenz verzichten muss.
Über ihre ernährungsphysiologischen Vorzüge hinaus zeigen diese Cracker die Schönheit selbstgemachter Speisen: die Möglichkeit, Aromen genau nach Ihren Wünschen anzupassen, unnötige Zusatzstoffe zu vermeiden und die Freude am Selbermachen zu genießen. Egal, ob Sie bereits ein erfahrener Bäcker sind oder gerade erst mit dem gesunden Kochen beginnen, diese Cracker bieten einen einfachen Einstieg in die Welt der nahrhaften Snackzubereitung.
Genießen Sie sie als Snack, als Beilage zu Ihren Lieblingsdips und -aufstrichen oder als Beilage zu einer liebevoll zusammengestellten Käseplatte. Wie auch immer Sie sie servieren, diese Cracker beweisen, dass die gesündesten Optionen auch die leckersten sein können.